• Blog
  • Shop
  • Resources
  • FAQ (Ask TGS)
  • About
  • Archive
  • Contact
  • Sign In My Account
Menu

The Gentleman Stationer

Vintage Living in the Modern World.
  • Blog
  • Shop
  • Resources
  • FAQ (Ask TGS)
  • About
  • Archive
  • Contact
  • Sign In My Account

To Eyedropper or Not to Eyedropper, That Is the Question

July 3, 2022

As part of this general trend of downsizing everything to a more manageable size, I’ve been trying to write dry all of the various fountain pens that I have inked up, and wow, is that hard to do when so many of them are cartridge-converter pens set up as eyedroppers. I go back and forth on whether, overall, I enjoy eyedroppering. While it’s nice to have the ginormous ink capacity, I’m not sure that convenience outweighs the various downsides given where I live and my current work/life situation.

A Bit of Background

For those new to pens, an “eyedropper” or “eyedroppering” is when you manually fill the barrel of a fountain pen with, well, an eyedropper directly from a bottle of ink. In today’s fountain pen market, there are two types of eyedroppers: Japanese-style eyedropper pens, which comes equipped with a valve system you can use to prevent leaks when you’re not writing, and the “converted” eyedropper, which is essentially a cartridge-converter pen sealed in a manner that allows you to use the full barrel as an ink reservoir. Eyedropper fountain pens can be great for those of us who do a lot of writing, as they can easily hold 3-5ml of ink in the barrel, depending on the size of the pen.

The Schon DSGN Ultem Fountain Pen in Amber (right) is eyedroppered.

To Eyedropper, or Not to Eyedropper

At this point in my fountain pen “career,” I’m not as much of a serial ink changer and mostly enjoy using the same handful of colors, so I can appreciate not having to refill fountain pens very often. That said, the recent hot weather here in balmy Tennessee reminds me of the many downsides to eyedropper fountain pens, namely drastic temperature swings moving outdoors to the car to the office, which causes the pen to burp - no, belch, ink into the cap unless there’s a valve mechanism like that available in the Opus 88 series. For this reason, I’m personally moving away from eyedroppers in favor of other filling options, unless the pen in question has a shut-off valve.

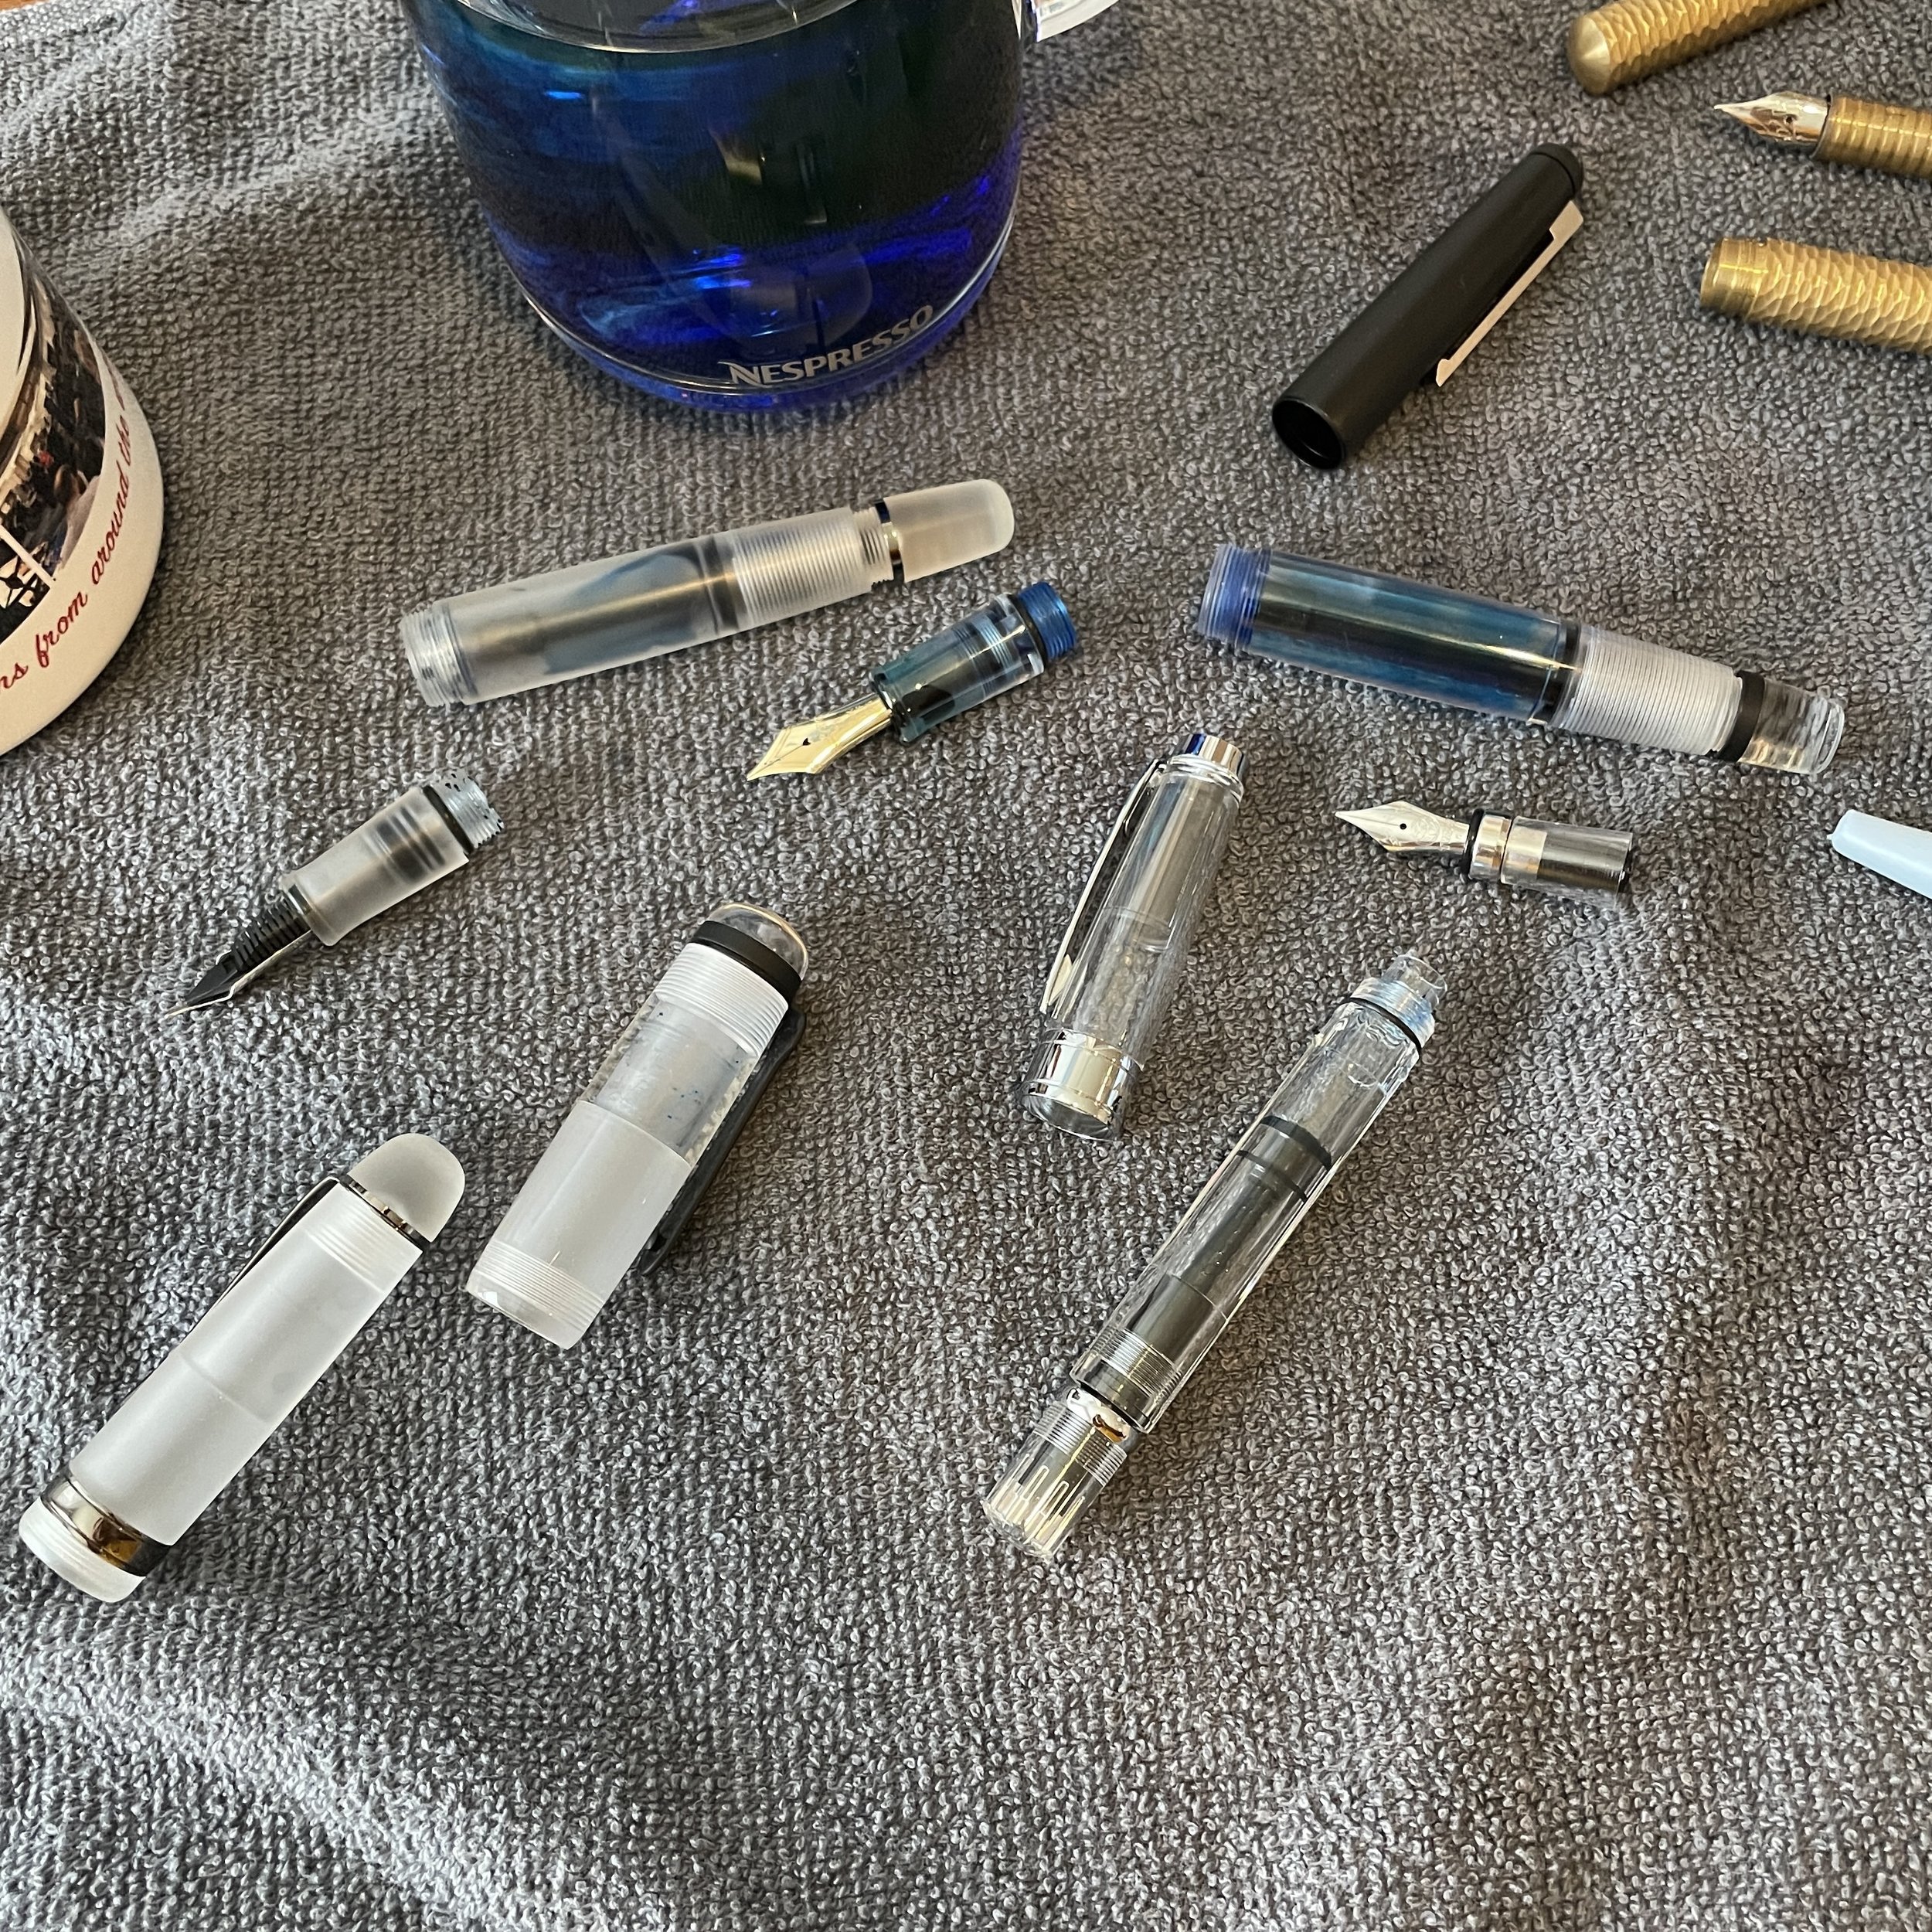
The sections of the Schon DSGN Engineered Plastics Fountain Pens come with o-rings installed. No silicone grease is necessary, though some people choose to use it for double protection against leaks.

For those who live in more moderate climates, or who view maximizing ink capacity and eyedroppering as a challenge they absolutely cannot pass up, there are a few things you can do to ensure that your eyedropper fountain pens behave and don’t cover you in ink.

  • Add O-Rings or Silicon Grease. If you don’t seal the threads around the section and the screw in nib unit, ink will eventually migrate up the threads and leak. Silicon grease is inexpensive and can be purchased from many pen shops. You only need to use a small amount (just enough to coat and fill the area between the threads), and for the section, a thin rubber o-ring will work as well. (Schon DSGN plastic pens, discussed below, already come equipped with o-rings and “eyedropper ready”.)

  • Fill ‘er Up! If you’re going to be flying with the pen, or otherwise moving between locations with large temperature or air pressure swings, make sure the pen is full before travel. It’s counterintuitive, but a full pen without any air in the barrel is much less likely to leak. The number one cause of fountain pen “inkcidents” is air expansion due to shifts in temperature and pressure, which causes air in the barrel to expand, pushing ink out the nib. For more on traveling/flying with fountain pens, check out this post here.

  • Keep the Pens Nibs Up. The main reason I prefer the Opus 88-style eyedropper pens is because you don’t have to worry about this factor. I’m back to commuting 3-4 days a week, so my pens are going with me in the car each day. In addition to the wild temperature swings we’ve been experiencing, I’ve had issues with ink leaking out if my briefcase falls over or my pen case shifts sideways, not to mention if I’m flying and have to slide my carry-on bag under the seat or into the overhead compartment.

Franklin-Christoph Model 20 (left) and Model 03 (right, orange pen) generally make good eyedroppers if you remove the converter and apply grease.

What Are the Best Fountain Pens for Eyedroppering?

Generally speaking, any plastic or acrylic pens without holes in the barrel or internal metal parts can be eyedroppered. (Metal doesn’t play well with liquid, though some people have had success with non-reactive titanium. Personally, I don’t tempt fate.) That said, there are a few brands that market their pens as “eyedropper friendly,” with caveats. Note that these will all require some work on your part to convert from cartridge-converter to eyedropper, as I’ve noted above, with the exception of the Opus 88 eyedroppers.

  • Most Franklin-Christoph Fountain Pens. I’m partial to the Model 20, which has a slip cap and a No. 6 JoWo Nib. Their smaller pens that feature the No. 5 JoWo nib also have better inkflow when eyedroppered, in my opinion. (This is due to the nib and feed, not the pen design.)

  • Schon DSGN Engineered Plastics Collection. You can read my full write-up here, but as I mentioned above, these pens come equipped with multiple o-rings to make them as eyedropper-friendly as possible.

  • Most Acrylic or Ebonite Bespoke or Custom Pens. Buy a pen from Shawn Newton or Edison Pens, and you can probably eyedropper it, provided you add silicone grease or an o-ring. If you’re ordering a custom pen specifically to be used as an eyedropper, let them know and they may be able to design the pen to maximize the ink capacity.

I hope you found this post helpful! Going forward, I’d like to write more of this type of “Fountain Pens 101” content. If there are topics that you’d like to hear or learn more about, leave a comment or drop me a line via the “Contact Me!” page. I’d love to hear from you!

NOTE: We are clearing out a lot of our store in anticipation of a site redesign/redirection. Take 10% off all orders using the coupon code SUMMER at checkout, in addition to already low clearance pricing on certain items. Excludes certain brands, including TWSBI and Lochby.

This post does not contain affiliate links or paid advertising. Any third-party links are uncompensated referrals.

In Editorial, How To Tags Eyedropper, Japanese-Style Eyedropper, Fountain Pens, Fountain Pen Maintenance, Fountain Pens 101
4 Comments

Don’t drink the ink.

Fountain Pen Maintenance: How I Clean My Fountain Pens

May 25, 2022

Every once in a while I like to take things back to basics and talk a bit about how to care for, maintain, and store fountain pens. While not as “high-maintenance” and messy as some would have you believe, fountain pens definitely require more attention than your typical ballpoint or rollerball in order to maintain an enjoyable writing experience. So what brought this particular topic to mind today? Well, I finally have a sink in my dedicated work area, so I can actually flush out some pens that I’ve been waiting to clean since the Baltimore Pen Show back in March.

For 90% of cleaning jobs, you need little more than a glass of water, a towel, and (maybe) a bulb syringe.

My cleaning process is pretty simple, and I follow three steps:

  • Start (and Finish) With Water. Most of the time, since I use fairly unexciting inks without permanence, shimmer, sparkles, extreme iron gall content, etc., I can make do with a glass of water. I can flush the pen by running plain water through the filling mechanism 5 or 6 times, and that’s typically more than sufficient to clean the pen to a point where you won’t have old ink drying up in the feed and clogging the pen, nor will you see traces of the previous ink when you go to refill it. To dry the pen out I will usually (GENTLY) place the pen nib down in a glass with a folded paper towel or tissue at the bottom for padding, which will wick out any remaining inky water. Note: Some people will probably flip out when they hear that I place the flushed pens nib-down to dry. I’ve never damaged a pen this way but as with everything here, proceed at your own risk and do what you are comfortable with.

  • Proceed to Water + Dish Detergent for Stubborn Messes. If I have a fountain pen where the ink has dried out, or a pen that was inked with a super-saturated color or shimmer ink, I will add a drop of dish detergent (i.e., Dawn) to a large glass of water and repeat step one. 9/10 times, this fixes any problem I have cleaning stubborn pens. In my experience, “pen flush” or dedicated cleaning fluids are almost always unnecessary, though they can sometimes speed up the cleaning process. Buy them from a pen store (preferably a pen manufacturer) and don’t try to make your own with ammonia, diluted Windex, etc. Certainly don’t use them with expensive pens or rare materials like celluloid or other vintage plastics because you never truly know what’s in them or how the material will react.

    • Buy a Bulb Syringe. For either of these first two steps, you might want to pick up a bulb syringe. For cartridge-converter pens, it’s easier to flush water through the section using the bulb syringe than it is the converter, which doesn’t move much water at all. Just be sure to grip the section firmly because a bulb syringe can form a seal and cause the section to go shooting across the room if you’re not careful.

  • Buy an Ultrasonic Cleaner. IF you think you need one. That’s a big “IF” for me, because I hardly ever break mine out, and when I do it’s for pens like the Parker 51, Lamy 2000, or other hooded-nibs where flushing the pen is inadequate because it doesn’t necessarily get water to all parts of the feed. Vacumatic fountain pens are also easier to clean with an Ultrasonic, since the filling mechanism doesn’t push water through the feed with much force.

Cartridge-Converter section with a bulb syringe attached. It takes no time at all to clean a nib/section using the bulb syringe to flush water through the feed.

For tough jobs, a $40 ultrasonic jewelry cleaner (purchased at Bed, Bath & Beyond or Amazon on sale) is all the “heavy equipment” you’ll need. I typically use plain water, though you can add a drop of dish detergent if you like. Just be sure to flush the pen clean afterwards. (And if you’re considering remodeling, a grey or black sink is a nice upgrade to your “pen room” to hide the ink stains!)

Drying cleaned fountain pens nibs-down, which allows any remaining inky water to leach out. Just be sure to rest the nibs on a folded paper towel. As you can see, I don’t baby my pens.

Final Thoughts and Further Reading

To summarize my philosophy on cleaning fountain pens: Clean relatively frequently and go slowly, only adding substances other than water to the cleaning process if absolutely necessary. I think you’ll find that for most inks and most pens, it’s not. For some additional information and further reading on techniques for cleaning specific types of filling systems, check out this previous post.

I will likely do a further post on this topic at a later date, but favorite high-ink-capacity pens that are easy to clean include the TWSBI 580 piston filler, and the Opus 88 Japanese-style eyedroppers. I was able to flush all of these demonstrator pens perfectly clean in less than a minute since the sections separate and allow you to access the interior. Run them under the sink and/or flush them with a syringe.

This post does not contain third-party affiliate links. The Gentleman Stationer is supported entirely by purchases from the T.G.S. Curated Shop, and memberships via the T.G.S. Patreon Program.

In Editorial, How To Tags Pen Cleaning, Cleaning Fountain Pens, Fountain Pen Maintenance, Editorial
4 Comments

Hotel desk shot as I nervously prepare to open my pen rolls after flying with eight fully inked fountain pens.

Your Questions Answered: Flying with Fountain Pens

March 12, 2022

A common question I’m asked concerns fountain pens and travel, namely, “Can you fly with a fountain pen?” or “Can you take inked fountain pens on an airplane?” The answer I always give is “Yes”, with a few qualifications. I flew out to Baltimore on Thursday, and as my flight was sitting on the tarmac getting ready to leave Nashville, I realized that I had (inadvertently) packed five eyedroppered fountain pens, two Parker 51s with vintage aerometric filling systems, and a Lamy 2000, all of which were more than half-full of ink. Experiment time!

Instagram Poll Results

My first thought was to ask the readership (via Instagram): Which pens do you think will leak? Here’s what you all thought:

Two of the eyedroppers were Opus 88 Japanese-style pens with the shut-off valve, so I didn’t include them in the poll. Predictably, they didn’t leak.

Real World Results

And the “real world” test results? The only pen that truly leaked - meaning that it dumped a bunch of ink into the cap to the point where I had to rinse it out - was one of two Parker 51s with a vintage aerometric-filling system. Interestingly, a modern “fantasy” Parker 51 that used the same filling system but had a modern barrel and cap didn’t leak or even burp ink slightly. All three Schon Design eyedroppers had absolutely zero ink in the cap or on the nib, and my Lamy 2000 had a blob of ink on the feed that required me to blot it prior to writing. Importantly, I did NOT keep these pens “nibs up” during the flight. They were in my bag, in my pen case on their sides as I had to slide my backpack under the seat.

This unintentional experiment confirmed that you don’t have to worry excessively about flying with fountain pens. It’s never been something that I obsessed over, and these results are typical of what I’ve experienced over the years. Only one out of eight pens burped a significant amount of ink into the cap, though no ink leaked into my pen case, and that one pen was a vintage pen which I probably shouldn’t have flown with inked up anyway.

Tips and Techniques for Flying with Fountain Pens

If you absolutely want to minimize the possibility of a leak when flying with fountain pens, I might suggest the following general tips:

  • Fly with eyedropper/vacuum-filler pens with shut-off valves, such as Opus 88 pens, the TWSBI Vac700R, or the Pilot Custom 823 (among others).

  • Make sure any pens with other filling systems are full. This sounds counterintuitive, but it’s the expansion of air inside the filling system as air pressure changes that pushes ink out of the nib during a flight. If you remove the air by filling the pen immediately before taking off, you have a smaller chance of a leak.

  • Remove your pens from your carry-on bag and fly with them nibs-up in the seat pocket in front of you. Just don’t forget to take them with you when you deplane. I’ve heard horror stories.

  • Don't fly with vintage pens inked, especially vacumatic and aerometric filling systems. I’m no vintage pen expert, and can’t say why specifically these pens (in my experience) tend to leak more often than modern pens, but I suspect it’s due to modern feed/section/housing designs that minimize leakage. The majority of airplanes leaks I’ve experienced have involved me flying with vintage pens to or from a pen show.

Again, these are not absolutes, and there are no guarantees that you won’t have an issue, but I’ve had a lot of success flying with fountain pens and regularly do so.

Check in on my regular updates from Baltimore via Instagram!

Check Out My Instagram for Real-Time Photos of the 2022 Baltimore Pen Show!

I’ve been posting a series of pictures from the 2022 Baltimore Pen Show, ranging from crowd photos to vendors to nib grinders. It’s a combination of posts and stories (the latter of which are saved to the highlights so they don’t expire), and I’ll continue through today. To give you some examples of what you can find at the show, I picked up several inks from the Laban “Greek Mythology” series, took delivery of some specialty nib grinds I ordered from Custom Nib Studio (Gena Salorino), and had nibs ground in person by J.C. Ament (The Nib Tailor) and Josh Lax (J.J. Lax Pen Co).

Also, to celebrate the Baltimore Pen Show, and to compensate for the fact that I don’t have a table, all orders placed in the Curated Shop while I’m traveling this week will receive a free gift, and I’ve also added some new items from my personal collection to the Gently Used page.

This post does not contain paid third-party affiliate links, and I paid for all products featured in this post with my own funds. The Gentleman Stationer relies upon purchases from the T.G.S. Curated Shop and the T.G.S. Patreon Program for support.

In Editorial, How To, Pens, Vintage Pens Tags Travel with Fountain Pens, Flying with Fountain Pens, Editorial
2 Comments

Customizing Stationery: If Your Ideal Product Doesn't Exist, Make It Yourself!

July 14, 2021

If you fall deep enough into the stationery hobby, you inevitably will find yourself customizing your gear. Whether that means having fountain pen nibs custom ground for your writing style, mixing your own inks with an ink mixing kit, or binding your own notebooks and paper refills, there are literally dozens of different rabbit holes for you to explore. Even for someone like me, who’s essentially “tried everything” over the years, I love that I can still create new ways to keep this hobby interesting!

A Traveler’s Notebook refill compared against a standard A5 softcover notebook.

One thing I’ve not attempted much over the years is customizing notebooks. I have neither the space nor the time nor the skill to try bookbinding, and I’m fairly confident that I’ve exhausted all the goodwill of the other members of my household with my various hobbies, so making my own books is out the window. But what about cutting down or trimming notebooks from my existing stash where the size isn’t something I use? I’m talking specifically about softcover A5 notebooks - somehow I’ve accumulated a dozen or more of these small, “single subject” notebooks over the years, but if I use a thinner notebook, it tends to be in the Traveler’s Notebook system. What if I just cut the larger notebooks down?

The great thing about standard Traveler’s Notebook refills is that they are the same length as A5, just narrower, so you only need to make one cut. Not only did I convert a few softcover A5 notebooks into additional refills for my Traveler’s Notebook (see photo at top), but I created a thicker bullet journal/undated planner for my personal Traveler’s Notebook using a 1/2-Year Stálogy notebook. I recently finished an undated Weeks + Memo Traveler’s Notebook Planner Refill, and found myself wanting something that would last six months or longer for work purposes. Check this out:

Stálogy paper is extremely thin, so my trimmed-down 1/2-year notebook easily fits in the Standard-size Traveler’s Notebook cover.

Getting Started

If you’re interested in attempting to trim down notebooks, I would start with a very sharp X-Acto or other craft knife (I used a No. 11 blade), a cutting mat, and some sort of straight-edge like a T-square that will help you make a straight cut. I purchased all of the above at Hobby Lobby for around $40. (I’m sure you can find it for less online, but I was bored on a weekend and wanted instant gratification.) I would NOT recommend using a “paper guillotine” or other paper cutter, unless you have access to a commercial-grade tool that’s been sharpened and calibrated so that it cuts evenly. On the notebooks pictured above, I tried to use the paper cutter in my office, but it made cuts that were neither straight nor clean, so I had to finish with the X-Acto. Based on my experience so far, very thin paper such as Tomoe River or Stálogy cuts the easiest with an X-Acto knife. Just be sure to practice on a less expensive refill first.

I do sell 1/2 year and 365-day Stálogy notebooks in the Curated Shop, in several different colors. As an aside, if you would like me to cut a notebook down for you, I’m happy to discuss, though it’s not an “official” service I offer or advertise so I can’t guarantee results. Please reach out and we can talk about what you need.

I wish I could claim credit for the idea to cut down the Stálogy Notebook, but credit goes to @stacysplans on Instagram. Follow her account for more planner-related ideas and content. While I am an authorized Traveler’s Company and Stálogy retailer, this post does not contain third-party affiliate links.

In How To, Paper Products Tags Custom Stationery, Custom Notebook, Cutting Down Notebooks
2 Comments

Traveler's Notebook Tutorial: How to Connect Multiple Refills and Accessories

February 27, 2021

I’ve used the Traveler’s Notebook for years, and regard it as one of the best options for carrying multiple notebook refills inside a single cover. Want to carry a planner, notebook, and sketchbook together, with different papers? You can do that! While connecting multiple refills can seem tricky at first, it’s easy and intuitive once you get the hang of it. The general rule of thumb to remember: A primary refill secured to the notebook cover using the center elastic cord serves as an “anchor” for the entire system, allowing you to add additional refills and accessories using connecting rubber bands.

Changing out a single Traveler’s Notebook Refill is easy - just open the refill to the “staple page” and slip it under the center elastic cord. But most people will want to maximize this notebook system’s versatility. Read on to learn how to add mor…

Changing out a single Traveler’s Notebook Refill is easy - just open the refill to the “staple page” and slip it under the center elastic cord. But most people will want to maximize this notebook system’s versatility. Read on to learn how to add more!

Collect Your Traveler’s Notebook and Supplies

In order to assemble a Traveler’s Notebook containing up to three refills, you will need three things: a Traveler’s Notebook, your three refills of choice, and a package of connecting rubber bands. For this demonstration, I’m using a Passport size Traveler’s Notebook in “Camel” leather, but the process is the same for the Standard size. Here, I will walk through three different setups: a Traveler’s Notebook with two refills, a Traveler’s Notebook with three refills, and a Traveler’s Notebook with three refills plus accessories.

Clockwise from top left: Traveler’s Notebook Connecting Rubber Bands, Traveler’s Notebook Passport in Camel, Blank MD Refill (included in the Traveler’s Notebook Starter Kit), MD Paper Grid Refill, and Tomoe River (“Lightweight” Blank Refill).

Connecting Two Refills

To set up a Traveler’s Notebook with two inserts, attach the first to the notebook cover using the elastic cord, the same as if you were going to set your notebook up with a single insert. Take your second refill and place it next to the first, closed spine-to-spine.

Next, open both notebooks to their respective centers. Holding the two covers together, as shown here, loop a connecting rubber band over both notebooks. In your original refill, the rubber band should sit alongside the elastic cord. That’s it!

A two-refill notebook is perfect for a planner + notebook setup.

Connecting Three Refills

To assemble a Traveler’s Notebook with three inserts, start by picking your three books and decide the order in which you want them to appear in the notebook. Place the first and third inserts back to back, and set the second one aside for the moment.

Open the first and third refills to their centers, and using a connecting rubber band, attach them as shown above, similar to how you connected the inserts in a two-refill notebook.

Close the two refills, and set them face-down on the inside of the Traveler’s Notebook Cover, spine-to-spine and connected by the rubber band.

Gently pull the two notebooks apart, and pull the elastic cord up between the two refills. The connecting rubber band should be just loose enough to allow you to do this easily.

Slip your middle refill underneath the center elastic cord. There! You’ve now secured three refills inside.a Traveler’s Notebook!

Traveler's-Notebook-Three-Refills.jpeg

Adding Accessories

Your Traveler’s Notebook is only limited by how thick you want it to be. In addition to three refills, connected as demonstrated above, I’ve included a PVC Zippered Pouch and a set of TRC Sticky Notes on my Standard Size Traveler’s Notebook.

Attaching the PVC Pouch is pretty easy. I simply slid the pouch underneath the refills through the main elastic cord.

I then attached the Sticky Notes to the PVC Pouch using another connecting rubber band.

The Sticky Notes insert is actually a slim folio, with a think PVC cover to protect your unused stickies. Open the folio and slip the connecting rubber band over the cover and the PVC pouch, much the same as you would connect two notebook inserts.

My current Standard Traveler’s Notebook is set up with three paper inserts and two accessories - in other words a total of FIVE refills + accessories. This obviously increases the thickness and weight of the notebook, but it also transforms it into …

My current Standard Traveler’s Notebook is set up with three paper inserts and two accessories - in other words a total of FIVE refills + accessories. This obviously increases the thickness and weight of the notebook, but it also transforms it into a powerful all-in-one tool.

Traveler’s Notebooks and Accessories in the T.G.S. Curated Shop

All of the Traveler’s Notebooks, refills, and accessories pictured here are available for purchase in the T.G.S. Curated Shop. As an authorized Traveler’s Company retailer, we carry Notebook Starter Kits, MD Paper Refills, Planner Refills, Specialty Paper Refills, and Accessories, in addition to TRC Brass products such as pen cases, rulers, and clips. Please feel free to reach out through the site if you have any specific questions about Traveler’s Notebook products and how to use them. If you’re interested in reading further on my own Traveler’s Notebook setup, check out this recent post in which I walk through the standard setup pictured here.

In How To, Guide, Notebook Review, Planners Tags Traveler's Notebook, Traveler's Company, How To
4 Comments
← Newer Posts Older Posts →
Store Location
Visit the T.G.S. Curated SHOP
*New* Updated "Best Pens" Guide (2025)
TGS x Hinze Pens Violet Tendencies Taschenstift Fountain Pen
Hierarchies of Fountain Pen Friendly Paper
Allex Scissors arrayed on a desk showing link to desk accessories

Join Our Patreon!
Subscribe to the TGS E-mail List

Featured Posts

Featured
Pilot-Iroshizuku-Yama-Budo-Writing-Sample.jpeg
May 24, 2025
Joe's Picks: Five Favorite Inks From Pilot's Iroshizuku Lineup
May 24, 2025
May 24, 2025
Yamamoto-Gray-Paper-Sampler-Set.jpeg
May 10, 2025
Discovering Unusual Paper: "Paper Tasting" Sets from Yamamoto Paper
May 10, 2025
May 10, 2025
Four-Micarta-Fountain-Pens.jpeg
Apr 19, 2025
Yes, Micarta for me! I finally got my hands on Some Micarta Pens, Plus My Own Special Edition
Apr 19, 2025
Apr 19, 2025
The Gentleman Stationer RSS

© Digital Divide Media, LLC, 2014-present.

All content is the exclusive property of Digital Divide Media, LLC, d/b/a The Gentleman Stationer, including “The Gentleman Stationer” website and trademark, and should not be reproduced without express written permission.  All rights reserved.

All content containing paid advertising, affiliate links, or sponsored content will be plainly disclosed by a disclaimer when/if featured.

Contact Information

Store Shipping Policy and Return Policy

Privacy Policy

Cookie Policy

Terms and Conditions

Powered by Squarespace